Saturday, October 14, 2023

2022 Retrospective

I'm writing a retrospective very late this year, but we're still here, still learning, still developing this site.

We created a fourth forest patch, and we forested the walking labyrinth and the tropicals patch on the east side of the house.  In all of these areas, we used a planting approach designed maximize the rate of early biomass development with minimum inputs of water, seeds, and imported (i.e. from outside the site) material.

We did this by 1) watering with network of dripline (1/2" tubing with pressure-compensating emitters embedded at intervals in the tube wall), and 2) concentrating the seeds and added growing medium along the dripline.

This strategy of concentrating inputs in lines was accidentally inspired by the success of the annuals we planted last year in the walking labyrinth, where the walking path naturally results in a linear planting bed.

We set up a kitchen garden1 in the northwest quarter where we used the linear planting approach described above in addition to the hay mulching2 approach we started using the year before.  In my 2021 retrospective, I mentioned that the chickens helped us prepare this plot.

We harvested wheat for the first time in 2022.  It turned out to be much easier than I expected to harvest and prepare a small batch of wheat3.

We pollarded (i.e. pruned back to the trunk) our moringas for the first time in 2022.  The picture to the right was taken in April, 2023, and you can see how severely we pruned them back, and how quick the trees were to regrow.

As we pruned the branches, we harvested the leaves.  We ate some of the leaves fresh, some we froze, but most we dried and ground into powder.


On the book learnin' front, a couple topics I studied in 2022 related to Sage Garden were facilitation4,5, regenerative work6,7,8, and system thinking for sociocultural change9,10,11.

I'll leave the final words to a couple of wild beings who visited us in 2022 to do their thing.


References

1. Maureen Gilmer, Growing Vegetables in Drought, Desert & Dry Times (Seattle: Sasquatch Books, 2015)

2. Ruth Stout, Gardening Without Work (Battleboro: Echo Point Books & Media, LLC, 1961)

3. "It's Easy to Harvest and Process a Little Grain." YouTube, uploaded by Sage Garden Ecovillas, 29 May 2022, https://www.youtube.com/watch?v=kV9_ddVwm5g

4. Sam Kaner, Facilitator's Guide to Participatory Decision-Making (San Francisco: Jossey Bass, 2014)

5. Henri Lipmanowicz and Keith McCandless, The Surprising Power of Liberating Structures (Seattle: Liberating Structures Press, 2013)

6. Adam Kahane, Transformative Scenario Planning (San Francisco: Berret-Koeler Publishers, Inc, 2012)

7. Michael J. Goldberg, The 9 Ways of Working (Cambridge: Da Capo Press, 1999)

8. Carol Sanford, Indirect Work (Mill Creek: InterOctave, 2022)

9. Jay W. Forrester, Principles of Systems (Waltham: Pegasus Communications, Inc., 1990)

10. Donella H. Meadows, Thinking in Systems (White River Junction: Chelsea Green Publishing, 2008)

11. David Peter Stroh, Systems Thinking for Social Change (White River Junction: Chelsea Green Publishing, 2015)

Friday, December 31, 2021

2021 Retrospective, 2022 Prospective

2021 Retrospective

I'm really grateful for Charlie's and Lucy's help this year, and for the opportunity to watch and participate in their projects on site.  We have more than ever to "show and tell" at the end of 2021.  And I think we've also made lots of "productive mistakes" (the kind we can learn from).


We had opportunities apply new (to us, anyway) gardening methods1,2 in Lucy's new garden bed, Charlie's grow boxes, and in managing the banana patch and the walking labyrinth.


We learned more3,4 about creating and managing food forests, and applied that knowledge to recondition our second food forest area, create a third food forest area, experiment with annuals under the canopy of our first food forest area, and plant culinary herbs at the south edges of food forest areas.


We experimented with low water use irrigation methods5, including ollas and wicks.


We practiced some new methods for cycling nutrients, including the Johnson-Su bioreactor, windrow composting, static composting, and home-grown plant-based liquid fertilizer6.

We added other physical elements to the site, including expanded irrigation, arbors, outdoor sitting areas, a temporary chicken pen I'm using as you would a chicken tractor, and as usual, more trees.


In addition to the physical elements we've added to the site, we've made progress this year on some non-physical assets, including a site design upgrade, seasonal surveys to record the seasonal state of the plants every 10 days, and I've been informally studying7,8 what I suppose you could call "complementary economics" (economic systems that can be embedded as a complement within the standard economy).

2022 Prospective

Some things I'm looking forward to in 2022 are expanding the food forest, fertilizing our plants with local and resident nutrients, growing trees and bushes from cuttings, foresting the labyrinth, gardening around one of the olives, hay mulching, creating a kitchen garden in the northwest, and possible experimenting with ponds.

- Jason

Throwback - Five Years Ago

Here are some before / after photos from the east side of the site.  The "before" photos on the left are from Oct 2016; the "after" photos are from Dec 2021 (also, there's an updated video tour).


References

1.  Charles Dowding and Stephanie Hafferty, No Dig Organic Home & Garden (Hampshire: Permanent Publications, 2017)

2. Ruth Stout, Gardening Without Work (Battleboro: Echo Point Books & Media, LLC, 1961)

3. Martin Crawford, Creating a Forest Garden (Cambridge: Green Books, Ltd, 2010)

4. Patrick Whitefield, How To Make A Forest Garden (Hampshire: Permanent Publications, 2002)

5. David A. Bainbridge, Gardening With Less Water (North Adams: Storey Publishing, 2015)

6. Leopold Stocker Verlag, Sepp Holzer's Permaculture (White River Junction: Chelsea Green Publishing, 2004)

7. Bernard Lietar and Jacqui Dunne, Rethinking Money (San Francisco: Berret-Koeler Publishers, Inc, 2013)

8. Marjorie Kelly and Ted Howard, The Making of a Democratic Economy (Oakland: Berret-Koeler Publishers, Inc, 2019)

Thursday, March 11, 2021

2020 Retrospective, 2021 Prospective

 2020 Retrospective

2020 was full of milestones that signify growth in all of the literal and figurative gardens discussed in Tending Over Owning - Example of Four Gardens.

When a vacancy opened up in late 2019, I decided to look specifically for a resident whose demonstrated passion and purposes align with what I'm doing and learning at Sage Garden.  I found that in my friend Charlie, and I'm really grateful he's here.  His attitude and work have helped transform the tangible landscape, and the process of finding and co-creating with a more involved resident has taught me a lot about the how and the why of socially regenerative practices for multifamily sites.

Charlie dug infiltration trenches early in 2020, which put to use much of the gravel that once covered the yard (now replaced by wood chip mulch) and direct rainwater to our largest trees.  In the center of the picture to the right, you can see the end of an infiltration trench that winds past a mesquite, pines, a live oak, a host of new trees in the second food forest area, a guamuchil, an olive, an Arizona walnut, and a desert willow.

In spring, we finished a chicken house and moved in chickens, which provide a multitude of functions in a permaculture site like ours, like fertilizer, an option for site prep and pest control, eggs, and entertainment.


Charlie created a new garden bed outside his door, where he grows many varieties of hot peppers, onions, greens, roots, and other veggies.  He even cultivated purslane and created a website to chronicle the experience and share ideas with other gardeners around the world: https://taoest1.wixsite.com/purslane

We erected a grape trellis over our clothesline, which gave the grapes more room to spread and fruit, and reclaimed space to hang clothes.

Through research1,2,3 and direct experience with the
second food forest
area, we continue to learn 1) how to apply food forest methods from other climates to our arid region, 2) which patterns to modify for our climate and how, and 3) how to maximize the benefits of the food forest approach.

In mid-2020 I started informally studying soil microbiology, found many helpful videos with Dr Elaine Ingham and instructors mentored by her, bought a microscope, and now I'm teaching myself how to assess and improve our soil microbiology for increased yield, decreased water use, and improved ecosystem resilience.

We held small-scale, socially-distanced olive harvest events and learned some things about sharing live video.

We learned some new organic gardening practices: creating, charging, and applying biochar; and brewing, assessing, and applying compost tea and compost extract.

We developed a resident interview process that incorporates ideas from collaborative design4, lessons from intentional communities5, consensus-oriented decision-making6, presencing7, generative power8, and some home-grown ideas from our philosophy garden (such as this-or-better agreements).  When another vacancy opened at the end of 2020, this process helped us connect with many really well-aligned candidates and mutually select the right one - Lucy - from about 100 respondents.


We also rehabilitated our walking labyrinth, transplanted several prickly pear cacti, and of course planted trees: desert willows, a lime, a second avocado, a second guamuchil, and a guava.

2021 Prospective

We've already started in on our list for 2021, which includes a new Sage Garden Ecovillas sign, improving our soil microbiology, Lucy's new garden bed, a small-scale Johnson-Su bioreactor, a third food forest area experimenting with some new practices, underplanting our forest with veggies, upgrading irrigation zones, Charlie's getting his Master Gardener certificate which might involve some on-site projects, and of course planting trees.

- Jason


References


1. Andrew Mefferd, The Organic No-till Farming Revolution: High-production Methods for Small-scale Farmers (Gabriola Island: New Society Publishers, 2019)

2. David Jacke and Eric Toensmeier, Edible Forest Gardens, vols. 1, 2 (White River Junction: Chelsea Green Publishing, 2005)

3. Masanobu Fukuoka, The Natural Way of Farming: The Theory and Practice of Green Philosophy (Madras: Bookventure, 1985)

4. Ezio Manzini, Design, When Everybody Designs (Cambridge: The MIT Press, 2015)

5. Diana Leafe Christian, Creating a Life Together: Practical Tools to Grow Ecovillages and Intentional Communities (Gabriola Island: New Society Publishers, 2003)

6. Tim Hartnett, Consensus-Oriented Decision-Making (Gabriola Island: New Society Publishers, 2010)

7. C. Otto Scharmer, Theory U: Leading from the Future as It Emerges (Oakland: Berrett-Koeler Publishers, Inc, 2009)

8. Adam Kahane, Power and Love: A Theory and Practice of Social Change (San Francisco: Berrett-Koeler Publishers, Inc, 2010)

Tuesday, October 13, 2020

Compost Tea - With and Without Aerator

We're brewing compost tea, partly to go with our biochar.  We wanted to find out whether it's effective to aerate the tea by simply stirring it every day, so we started two batches of tea in 5 gallon buckets - one with a pump aerator and one without.

Why does aeration matter?  In theory, the beneficial microbes we want to cultivate in our tea are aerobic (oxygen-loving), whereas anaerobic (not oxygen-loving) microbes that would grow in the absence of oxygen tend to be parasitic or pathogenic to plants (and people).  Our pump aerator consists of an aquarium air pump connected to a loop of 1/4" soaker tubing, which you can see in operation in the image below.


The ingredients we used are:

- 4 gal dechlorinated water

- 6.5 oz compost

- 1 Tbsp kelp juice

- 1 Tbsp molasses


Normally we wouldn't have to measure this precisely, but in this case we wanted to make sure the only difference between the two batches was the presence or absence of the pump aerator.

Then we let the tea sit for three days, stirring one bucket every day and leaving the air pump on constantly in the other.  After three days, we got out the microscope and captured the videos below.

Aerated by stirring:


Aerated by pump:


Conclusion

The differences between the two buckets, in terms of quantity of individuals and species, were so dramatic I felt compelled to check three different slides from each bucket to confirm.
The pump-aerated batch was filled with cocci.  I don't know enough to identify the species, but it stands to reason they are aerobic and beneficial.
The stirred batch was filled with protozoa.  I also observed two shapes of bacteria: cocci and bacilli.  Again, I don't know enough to identify the species, but they're most likely anaerobic.
 
From now on, we'll be brewing all our compost tea with a pump aerator.


Saturday, October 3, 2020

Our First Batch of Biochar

There's much to catch up on: how our practices, theory, and philosophy continue to deepen; lessons we've learned from our second food forest area; what our chickens have taught us; new ways we've learned to prepare and eat onsite crops; and processes we've designed to fill a vacancy opening up later this year.  But for this little blog entry, I'd like to focus on our first batch of biochar.

Biochar is an organic, charcoal-like soil amendment that has a surprising capacity to hold water, soil microbes, and nutrients and prevent those nutrients from leaching from the soil.  We made a small batch (it'll probably crush down to 2-3 gallons) in a cone-shaped pit.  This approach required little time and effort, but it did require constant attention and careful timing to expel and burn the volatile compounds from the wood and pyrolize the cellulose without burning the resulting carbon.  We started burning a small amount of wood at the bottom of the cone, and continually added fresh wood at the right rate to keep the surface burning, while denying oxygen to the charred layers below, just in time to prevent the carbon from burning.

Once we had enough char for our first trial, we filled the pit twice with water (making huge billows of steam), which cooled our biochar and prevented it from slowly smoldering into a pile of white ash.

What Went Well

Extent of burning and pyrolysis - We did have a little white ash at the bottom of the pit (overburned), and a few of the larger sticks at the top were still brown in the center (underburned), but the rest of the batch was solid black as obsidian and brittle throughout - perfect.

Arrangement of sticks in parallel - Usually when you're building a wood fire, you want to criss-cross the wood for ventilation.  But because we wanted to minimize ventilation, we laid the sticks in parallel.  I don't have a control group to compare against, but I suspect that helped to halt combustion at lower levels.

Synchronic layering - The instructions we found suggested using discrete layers, in sort of an iterative but diachronic pattern of add, pause, add, pause ...  But instead, we continuously added wood at a deliberate rate, keeping an eye on the size of the flames and watching for white ash.  Again, I don't have a control, but I suspect this approach accelerated the process and gave us more even results.

What to Do Different Next Time

Cut more sticks ahead of time - While the fire burned, I spent much of my time quickly cutting sticks to length.  Next time, I'll cut sticks to length ahead of time so I can pay more attention to the fire.

Next Steps

We'll crush our biochar to smaller bits, adjust the pH of the ash we unintentionally produced (using some vinegar we accidentally made while brewing kombucha), and use various methods to load it up with microbes and nutrients.  One method we'll use is to scatter biochar in our chicken coop, where it will not only reduce odor, but also absorb ammonia and nitrifying bacteria.  Another method we may try is to mix it with compost and flour from mesquite pods that are no longer suitable for human food.


Thursday, January 16, 2020

Two Paths into the (Food) Forest - Part 3 - Philosophy and Strategies


In part 1 and part 2 I gave two different conceptions of the term "food forest" that I have held and described how the difference in definition resulted in different approaches to starting the food forest.  Now I'll describe some experimental strategies we used in our second section of food forest and list our plant palette of support species.

But before I do that, here are a few brief philosophical observations about the these two approaches.

I would say our second approach focuses more attention under the surface of the soil.  I don't mean this as a categorical distinction, but more as a matter of relative degree.  The first approach also relies on and intentionally cultivates subsurface life, but it puts a greater emphasis on supersurface production from the very beginning, where the second focuses more below the soil first and defers (again, relatively) focus on production.

The second approach shifts more of the work (e.g. importing mulch, applying fertilizer) and more of the "determination" (e.g. what to plant where and when) from the humans to the plants.

The first approach involves more development by building, and the second, more development by growing.  Again, this is a matter of relative degree.  In the first approach, parts (trees) are developed (partially anyway) offsite and then assembled onsite; fertilizer (at least the first application) is generated offsite and then imported and applied; and the the placement of all plants is effected by a human agent.  In the second, all parts at all scales are developed simultaneously in situ, and the placement (after thinning) will be influenced - even if not strictly determined - by how seeds land and which locations offer ideal growing conditions.

I often make the point that development by growing results in a product that emulates a living (biological) system, but more than that, I think it's a requisite to mastery.  Not that I'm a master at cultivating a food forest or even at gardening, but I can master being while I commit myself to the act of cultivating a food forest, thanks to development by growing, and thereby approach mastery of the act.

I said "brief" so let's get on with strategies.

Bermuda grass grows very quickly throughout most of the year in our climate.  For better or worse, we take intentional strategies to grow in spite of it.  Here are some strategies we have used at Sage Gardens, ordered from most passive to most active:
 - Deny it water (and cut it when it grows long)
 - Shade it out with plants
 - Smother it with mulch
 - Dig it out

By the way, two other strategies to deal with grass that I like but haven't practiced at Sage Garden are grazing and solarizing.
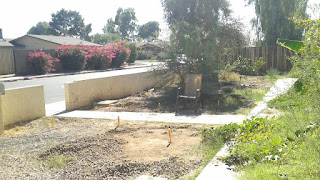
In the area surrounding the second section of food forest, we'll simply deny Bermuda grass water, and inside the food forest, we should have a canopy to shade it out pretty quickly.  The anticipated problem is along the edge, where grass can send leaves to get sunlight from the outside and send roots to get water from the inside.  Without some strategy for the edge, Bermuda grass might rob the trees of water and nutrients.  We used two "edge strategies" to avoid this.

Edge strategy 1: smother
Along a 17 ft portion of the edge is where a future arroyo is planned.  In order to get the food forest seeded right away (to take advantage of forecasted rain), we postponed digging the arroyo and "reserved" the space using contractor paper - a trick I took from James Prigione's food forest videos on YouTube.  We covered the paper with straw mulch to weigh it down and make it look nice.

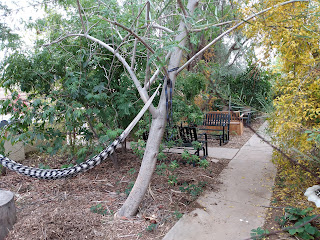
Edge strategy 2: shade

Along the rest of the edge, we heaped sweet potato vines.  This time of year we have an overabundance of sweet potato vines going dormant.  If some of these survive the winter (when the Bermuda grass is also dormant), they should sprint into action in the spring, shading any grass within several feet, and providing edible leaves and tubers.

Strategy: drip tube and valves
We tied into an existing irrigation line we were already using for more frequent watering, and ran two lines of drip tube, each 15 ft long, over the new forest area.  The drip tube has 0.6 gph emitters spaced at 1 ft, so in the two hour duration that we run this irrigation zone, this 70 sq ft area will get about 36 gallons.  Each of the two drip tube lines has its own shutoff valve (a simple 1/2" inline manual valve) to give us options if we want to cut the water volume in half later, or plant a "row" of veggies along one or both of the tubes.

Strategy: early canopy
I mentioned in part 2 that we're planting very densely with some fast-growing plants in order to form a low but tight protective canopy within 3-4 months.  This strategy is taken from Geoff Lawton's video "Establishing a Food Forest."

Strategy: plant by seed
Eight of the nine species of plants we planted in the new section of food forest were planted by seed.  Four of those species are from seeds we collected onsite (for free).  This strategy allows us to plant potentially (dependent on germination rates) 500 plants for a cost of about $25.  This makes it economically feasible 1) to employ our "early canopy" strategy, and 2) to overplant in compensation for my inexperience.  As I gain more knowledge and experience, I'll be able to get the same results with fewer seeds, but for now, I'm starting as I am.  We had a mix of large seeds of small quantities and small seeds of large quantities, so we first planted the large seeds under the surface, and then scattered the small seeds, to be covered later with straw mulch.  We used this order to avoid accidentally picking up small seeds on our shoes while we planted large seeds.

Strategy: let the plants do the work
We're relying heavily on our pioneer plants to 1) convert atmospheric nitrogen and other gases into bioavailable subsurface fertilizer, 2) convert water and atmospheric carbon dioxide into woody mulch, 3) regulate soil temperature and moisture by physically covering it, and 4) aerate the soil.  This strategy is inspired by the permaculture principle that "everything gardens."

Strategy: no dig, no amendments
We didn't till or amend our soil in any way.  We selected pioneer plants that can grow quickly in poor soil.  Honestly, the labor and cost to till and add amendments isn't prohibitive on this small scale, but we want to learn a way that can be upscaled.  This strategy is inspired by Masanobu Fukuoka's concept of do-nothing farming.

Strategy: legume seed + inoculant
Seven of the nine species are legumes planted by seed (and an eighth, moringa, although it isn't technically a legume also forms a symbiotic association with nitrogen-fixing bacteria).  We coated these seeds before planting with inoculants containing high concentrations of the rhizobium bacteria that will later cooperate with their roots to fix atmospheric nitrogen in the soil.  These bacteria are naturally occurring in the soil, but by inoculating the seeds, we hope to jump-start the nitrogen fixing process.

Strategy: fungus selection
I don't know yet whether this will work, but we intentionally started mushrooms of a species that 1) can thrive and hold its own in a Phoenix urban forest microclimate (without being picky about what it eats), 2) isn't parasitic, and 3) has delicious fruiting bodies.  For us, that translated into oyster mushrooms.  Since this species is saprophytic, it will start its life eating our straw mulch and later eat pruned branches.  And whatever it eats it will turn into food, either for humans or for subsurface organisms that will feed the trees.

Strategy: plant selection
Here are the criteria we used to select plants:
 - Must grow in poor soil
 - Must have mix of forms: some trees, some bushes, some ground covers
 - Prefer nitrogen-fixing plants
 - Prefer fast growers
 - Prefer native plants, followed by desert adapted
 - Prefer seeds we can collect from existing plants onsite
 - Prefer trees that can be pollarded or coppiced

All of which led us to the following plant selection for this section of food forest:
Plant Form Native Species Adapted Species Other Species
Tree 10 sweet acacias
Acacia farnesiana
35 leucaenas
Leucaena leucocephala
15 moringas
Moringa oleifera
Bush 35 pink fairy dusters
Calliandra eriophylla
35 baja fairy dusters
Calliandra californica
Ground 200 lupines
Lupinus arizonicus
25 trailing acacias
Acacia redolens
200 common vetch
Vicia sativa
8 sweet potatoes
Ipomoea batatas 


Friday, December 27, 2019

Two Paths into the (Food) Forest - Part 2 - Theory and Process

In part 1 I started describing the way my preferred, or maybe I should say habitual, definition of "food forest" has changed, and I hinted that there was a consequent difference in process between the way we started the first section of our food forest and the way we're starting the second section.

The first definition I described in part 1 focused more on the form of the forest (especially spatial characteristics); the second definition focuses more on function.
food forest2 an intentional assembly of trees and other plants that uses interactive diversity, vertical stacking (spatial strategy), and managed succession of species (temporal strategy) for the purpose of producing food and other products.
Yes, its form ends up being dense and reminiscent of a forest just like the first definition, but under the second definition this result is as incidental as it is unsurprising.  The first definition describes a static forest at climax (equilibrium) while the second also encompasses the natural dynamics that lead to climax.


 How does the difference in definitions affect the process of starting a food forest?  For us, we have seen a difference in imported vs. recycled nutrients, species composition (and how that changes over time), planting density (and how that changes over time), and the mechanisms used to nurture soil life.

We started the first section of our food forest by applying wood chip mulch liberally and planting food trees as saplings.  We applied compost and other organic fertilizers, and maintained the mulch layer by importing more mulch.  With time, effort, and imported material, this section is approaching the point where it will supply all of its own mulch.

We started the second section by planting "pioneer" (mostly legume) support species from seed: ground covers, bushes, and trees.  We covered these with a thin layer of straw mulch - just enough to slow evaporation and offer a little thermal insulation, but not too much to let some light through.  We selected pioneer species 1) with a preference for native species, 2) to grow quickly without fertilizer, 3) to prepare the soil (many by fixing nitrogen), and 4) to tolerate pollarding or coppicing.  If all goes well, by the time the annual ground cover dies out, the pioneer trees and bushes will have formed a low but tight protective canopy and start supplying woody mulch.

In the first section the soil life was slowly nurtured primarily by relying on a small but growing number of subsurface animals and fungi to carry nutrients from imported mulch and fertilizer down into the soil.

In the second section the soil life will be nurtured more quickly, primarily by relying on 1) live support plants to convert atmospheric gases into sugars and transport them down into the soil, and 2) symbiotically associated rhizobia (from the inoculants that we applied to the legume seeds) to convert atmospheric gases into subsurface fertilizers.

In the first section, we started with mostly productive trees planted at final forest density which slowly formed a canopy over 2-4 years, and now there's little room to add support trees.

In the second section, we're starting with an overly dense planting of support plants which will form a canopy within 3-4 months, and later we'll thin (pollard, coppice, or remove) them during strategic seasonal conditions to provide mulch and make room for productive trees.


I think I'll pause here for today, and maybe follow up with an entry about some detailed experimental strategies we used, including our support plant palette for a small Phoenix suburban site.